
How To Fix A Flat Tire
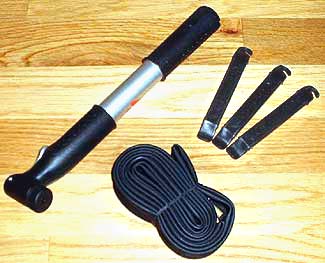
You'll need (l to r): a pump (carried on your bike or in a pack),
a spare tube (to replace the popped one) and tire levers (for removing the tire).
(photos), which makes it easier to get the wheel out.
Open sidepull brakes by fully rotating the little lever on the brake upwards (a).
Open linear-pulls (also called "V-brakes") by lifting the end of the "noodle" out of its holder (b).
Some sidepulls are opened by pressing a button on the lever. Look for this if there's no lever on the brake.
Open cantilever brakes (these feature a cable that runs over the top of the tire) by lifting the cable end on one side out of its holder.
Tips
Be safe! Work off the road/trail so a semi doesn't flatten you!
While it's possible to get the flat tire through the brake without opening it, it won't be so easy reinstalling the wheel when it's fully inflated. That's why we recommend opening the brake first.
If you have disk brakes, there's nothing to open. The wheel will come right out of the brake with no muss, no fuss. Cool.">
(photos), which makes it easier to get the wheel out.
Open sidepull brakes by fully rotating the little lever on the brake upwards (a).
Open linear-pulls (also called "V-brakes") by lifting the end of the "noodle" out of its holder (b).
Some sidepulls are opened by pressing a button on the lever. Look for this if there's no lever on the brake.
Open cantilever brakes (these feature a cable that runs over the top of the tire) by lifting the cable end on one side out of its holder.
Tips
Be safe! Work off the road/trail so a semi doesn't flatten you!
While it's possible to get the flat tire through the brake without opening it, it won't be so easy reinstalling the wheel when it's fully inflated. That's why we recommend opening the brake first.
If you have disk brakes, there's nothing to open. The wheel will come right out of the brake with no muss, no fuss. Cool." data-width="380px" data-height="208px" data-thumbnail="/images/library/site/maintenance_howtofixaflat_openbrake_lg.jpg">
3. With one bead in place, tuck the tube fully inside the tire and on top of the rim, which will cause the other bead to rest flush against the rim. Work this bead on starting at the valve as you did with the first. You may have to push the valve into the tire to provide clearance for the bead. Once you've got it started, work your hands away from the valve pressing the bead onto the rim around the wheel.
4. With a few inches of bead left to pop onto the rim, the tire will resist. Let all the air out. Crouch and rest the wheel on your knee to have something to push against. Now, hold the bead in place with one hand and with your stronger hand, push down to roll the stubborn section onto the rim with the heel of your hand (main photo). But don't try to pop it on all at once. Install an inch at a time, moving your hand along until you've fully installed the tire. Got it? Good job!!
Tips
Make sure that your spare tube's valve is the right type for your wheel.
Tubes that are slightly narrower than the tire fit fine and are easiest to install (for example: a 700 x 20c tube in a 25c tire and a 1.5-inch tube in a 1.9-inch tire).
A trick to create slack and ease tire installation is to go around the rim squeezing the tire beads into the rim's center (the deepest portion).
If you locate the tire label at the valve, you'll have a reference point when searching the tire for what popped the tube.">
3. With one bead in place, tuck the tube fully inside the tire and on top of the rim, which will cause the other bead to rest flush against the rim. Work this bead on starting at the valve as you did with the first. You may have to push the valve into the tire to provide clearance for the bead. Once you've got it started, work your hands away from the valve pressing the bead onto the rim around the wheel.
4. With a few inches of bead left to pop onto the rim, the tire will resist. Let all the air out. Crouch and rest the wheel on your knee to have something to push against. Now, hold the bead in place with one hand and with your stronger hand, push down to roll the stubborn section onto the rim with the heel of your hand (main photo). But don't try to pop it on all at once. Install an inch at a time, moving your hand along until you've fully installed the tire. Got it? Good job!!
Tips
Make sure that your spare tube's valve is the right type for your wheel.
Tubes that are slightly narrower than the tire fit fine and are easiest to install (for example: a 700 x 20c tube in a 25c tire and a 1.5-inch tube in a 1.9-inch tire).
A trick to create slack and ease tire installation is to go around the rim squeezing the tire beads into the rim's center (the deepest portion).
If you locate the tire label at the valve, you'll have a reference point when searching the tire for what popped the tube." data-width="380px" data-height="253px" data-thumbnail="/images/library/site/maintenance_howtofixaflat_installtire_lg.jpg">
(photo top), inflating further may blow the tire and tube off the rim! There's a bead line on the side of the tire (photo bottom) that should be equidistant from the rim all the way around on both sides of the tire. If it's not, or if you see a section of tube peeking out from under the rim, let the air out, work the tube back into place, reinflate partway and check the tire again. When it's seated correctly, inflate it fully. Install the valve nut (if your tube uses one) and cap finger tight (overtightening the valve nut can damage the tube and make it difficult to loosen it when you need to fix a flat). Reinstall the wheel in the frame, close the brake quick release or reattach the noodle or cable and you're ready to ride!
Tips
Not all portable pumps have the power to fully inflate all tires. But that's okay. You only need enough air to make the tire firm enough to ride on. If you can't get it hard enough to finish your ride, find a bike shop or head home to fix it properly.
The first time you fix a flat it may take 30 minutes to an hour. But, with practice, you'll get much faster. Experienced cyclists can easily repair one in 10 minutes.
If you ride regularly and haven't fixed a flat yet, practice at home to build your confidence.">
(photo top), inflating further may blow the tire and tube off the rim! There's a bead line on the side of the tire (photo bottom) that should be equidistant from the rim all the way around on both sides of the tire. If it's not, or if you see a section of tube peeking out from under the rim, let the air out, work the tube back into place, reinflate partway and check the tire again. When it's seated correctly, inflate it fully. Install the valve nut (if your tube uses one) and cap finger tight (overtightening the valve nut can damage the tube and make it difficult to loosen it when you need to fix a flat). Reinstall the wheel in the frame, close the brake quick release or reattach the noodle or cable and you're ready to ride!
Tips
Not all portable pumps have the power to fully inflate all tires. But that's okay. You only need enough air to make the tire firm enough to ride on. If you can't get it hard enough to finish your ride, find a bike shop or head home to fix it properly.
The first time you fix a flat it may take 30 minutes to an hour. But, with practice, you'll get much faster. Experienced cyclists can easily repair one in 10 minutes.
If you ride regularly and haven't fixed a flat yet, practice at home to build your confidence." data-width="379px" data-height="316px" data-thumbnail="/images/library/site/maintenance_howtofixaflat_inflatetire_lg.jpg">